06 March 2019

Different api versions to use in your manifest file

according to kubernetes : The API server exposes an HTTP API that lets end users, different parts of your cluster, and external components communicate with one another. The Kubernetes API lets you query and manipulate the state of objects in the Kubernetes API (for example: Pods, Namespaces, ConfigMaps, and Events)


                                  APIs are gateway to your kubernetes cluster

KindapiVersion
CertificateSigningRequestcertificates.k8s.io/v1beta1
ClusterRoleBindingrbac.authorization.k8s.io/v1
ClusterRolerbac.authorization.k8s.io/v1
ComponentStatusv1
ConfigMapv1
ControllerRevisionapps/v1
CronJobbatch/v1beta1
DaemonSetextensions/v1beta1
Deploymentextensions/v1beta1
Endpointsv1
Eventv1
HorizontalPodAutoscalerautoscaling/v1
Ingressextensions/v1beta1
Jobbatch/v1
LimitRangev1
Namespacev1
NetworkPolicyextensions/v1beta1
Nodev1
PersistentVolumeClaimv1
PersistentVolumev1
PodDisruptionBudgetpolicy/v1beta1
Podv1
PodSecurityPolicyextensions/v1beta1
PodTemplatev1
ReplicaSetextensions/v1beta1
ReplicationControllerv1
ResourceQuotav1
RoleBindingrbac.authorization.k8s.io/v1
Rolerbac.authorization.k8s.io/v1
Secretv1
ServiceAccountv1
Servicev1
StatefulSetapps/v1


alpha
API versions with ‘alpha’ in their name are early candidates for new functionality coming into Kubernetes. These may contain bugs and are not guaranteed to work in the future.

beta
‘beta’ in the API version name means that testing has progressed past alpha level, and that the feature will eventually be included in Kubernetes. Although the way it works might change, and the way objects are defined may change completely, the feature itself is highly likely to make it into Kubernetes in some form.

stable
Those do not contain ‘alpha’ or ‘beta’ in their name. They are safe to use.

30 December 2018

PROBES - Health check mechanism of application running inside Pod's container in Kubernetes

Kubernetes provides health checking mechanism to verify if a container inside a pod is working or not using PROBE.
Kubernetes gives two types of health checks performed by the kubelet.

Liveness probe
k8s checks the status of the container via liveness probe.
If liveness Probe fails, then the container is subjected to its restart policy.

Readiness Probe
Readiness probe checks whether your application is ready to serve the requests.
If readiness probe fails, the pod's IP is removed from the endpoint list of the service.

we can define liveness probe in three types of actions that kubelet performs on a pod:
  • Executes a command inside the container
  • Checks for a state of a particular port on the container
  • Performs a GET request on container's IP

# Define a liveness command
livenessProbe:
  exec:
    command:
    - sh
    - /tmp/status.sh; sleep 10; rm /tmp/status.sh; sleep 600
  initialDelaySeconds: 10
  periodSeconds: 5

# Define a liveness HTTP request 
livenessProbe:
  httpGet:
    path: /healthz
    port: 10254 
  initialDelaySeconds: 5
  periodSeconds: 3
# Define a TCP liveness probe
livenessProbe:
  tcpSocket:
    port: 8080
  initialDelaySeconds: 15
  periodSeconds: 20

Readiness probes are configured similarly to liveness probes.
The only difference is that you use the readinessProbe field 
instead of the livenessProbe field.

# Define readiness probe
readinessProbe:
  exec:
    command:
    - sh
    - /tmp/status_check.sh
  initialDelaySeconds: 5
  periodSeconds: 5 


Configure Probes
Probes have a number of fields that one can use more precisely to control the behavior of liveness and readiness checks

initialDelaySeconds: Number of seconds after the container starts before liveness or readiness probes are initiated.
Defaults to 0 seconds. Minimum value is 0.
periodSeconds: How often (in seconds) to perform the probe.
Default to 10 seconds. Minimum value is 1.
timeoutSeconds: Number of seconds after which the probe times out.
Defaults to 1 second. Minimum value is 1.
successThreshold: Minimum consecutive successes for the probe to be considered successful after having failed.
Defaults to 1. Must be 1 for liveness. Minimum value is 1.
failureThreshold: Minimum consecutive fails for the probe to be considered restarting the container. In case of readiness probe, the Pod will be marked Unready.
Defaults to 3. Minimum value is 1.


# example of Nginx deployment
apiVersion: apps/v1
kind: Deployment
metadata:
  name: app1
  labels:
    app: webserver
spec:
  replicas: 1
  template:
    metadata:
      labels:
        app: webserver
    spec:
      containers:
        - name: app1
          image: punitporwal07/apache4ingress:1.0
          imagePullPolicy: Always
          ports:
            - containerPort: 80
          livenessProbe:
            httpGet:
              path: /
              port: 80
            initialDelaySeconds: 5
            periodSeconds: 3
          readinessProbe:
            httpGet:
              path: /
              port: 80
            initialDelaySeconds: 5
            periodSeconds: 3


httpGet have additional fields that can be set
path: Path to access on the HTTP server.
port: Name or number of the port to access the container. The number must be in the range of 1 to 65535.
host: Hostname to connect to, defaults to the pod IP. You probably want to set "Host" in httpHeaders instead.
httpHeaders: Custom headers to set in the request. HTTP allows repeated headers.
scheme: Scheme to use for connecting to the host (HTTP or HTTPS). Defaults to HTTP

keep probing!

26 July 2018

Deploying application on Kubernetes cluster

In today's emerging world containers have become a prominent deployment mechanism. Let's see how you can deploy your containerized application to k8s cluster backed by a cloud provider.
Create an image using any container service, your application should adhere to all the essential requirements to get into a container.
Then you build your application image.
for ex: If I have to deploy my application on tomcat inside a docker image, so that everytime when I launch my docker image, it will launch my tomcat instance and deploy my application bundled in it and run as a container service, which further I can deploy on my docker-swarm or kubernetes cluster.
NOTE: You need a cloud provider or other controller that knows how to allocate an IP and route traffic into the nodes like GKE has that in GCP. If you are on-prem, k8s has no idea what infrastructure exists on your network so you need to use NodePort approach to generate endPoints or set up your own container n/w using cni-plugins provided by Calico, weave or flannel etc.
to acheive this your application should be encapsulated in a docker image with all the required resources. You can always scale your deployment and perform versioning of your deployment.
When you deploy an image it should be available in image:registry so that it can be called in your deployment manifest. Than you expose your application to the outside world using service resource of k8s. You can use any cloud provider to have a ready-made container platform like GKE, EKS, AKS to launch K8s cluster and deploying container directly on to it.

in short:
  1. Package your app into a container image (docker build)
  2. Run the container locally on your machine (optional)
  3. Upload the image to a registry/hub (docker push)
  4. Create a container cluster (cluster init)
  5. Deploy your app to the cluster (kubectl -f apply deployment.yaml)
  6. Expose your app to the Internet (kubectl -f apply service.yaml)
  7. Scale up your deployment (kubectl scale --replicas=2)
  8. Deploy a new version of your app

# creating a k8s-cluster in GKE using CLI else follow this to setup a cluster locally
$ gcloud container clusters create mycluster --num-nodes=2 --zone=us-central1-c # get the instance status $ gcloud compute instances list


Output:


# running a container-image on a k8s-cluster of kind deployment
$ kubectl run hello --image=punitporwal07/myapp:0.1 # To see the Pod created by the Deployment, run the following command
$ kubectl get pods


at times you see a different status after pulling the image or while fetching the pods status


ErrImagePull
ImagePullBackOff
CrashLoopBackOff
Running
so there are mainly three possible reasons behind such failures:
  1. The image tag is incorrect
  2. The image doesn't exist (or is in a different registry)
  3. Kubernetes doesn't have permissions to pull that image
whereas CrashLoopBackOff tells us that kubernetes is trying to launch your pod, but one or more of the containers is crashing or getting killed.

Let's describe the pod to get some more information:

$ kubectl describe pod myapp-7974b8cc6b-dvsgz(Name)

Deleting deployment/container from K8s cluster

first of all, you need to get the structure of your deployment resources

$ kubectl get all
$ kubectl delete deployment.apps/myapp

# since it has replicasets enabled it keeps spinning another pod for you deployment,
so you need to delete the deployment in order to stop its cycle
$ kubectl get deployments $ kebectl delete deployment myapp # and redeploy a fresh image $ kubectl run myapp --replicas=3 --image=punitporwal07/myapp:0.1 --port=8000 # expose you application to the internet in form of service $ kubectl expose deployment myapp --type=LoadBalancer \
   --port 8000 --target-port 8080 --name=myservice
 $ kubectl get service


once your service being exposed, you will see k8s will allocate and external IP to your service


NOTE: instead of deleting a GKE cluster to save cost, recommend to resize=0 by the following command
$ gcloud container clusters resize mycluster --size=0 --zone=us-central1-c

Then scale it back up later by running it with a non-zero value for the size flag.

Br,
Punit

28 February 2018

Debugging your kubernetes cluster

Whether you are a developer or an operations person, Kubernetes is an integral part of your daily routine if you are working with a microservice architecture. Therefore, it is always preferable to perform all your research and development on a test cluster before implementing it in an enterprise environment.

if you have not experienced setting up your own cluster yet, here is an article that will walk you through the process of launching your own k8s-cluster in different fashions.    

there are possible failures one can encounter in their k8s cluster so here is the basic approach one can follow to debug into failures.

 1. if a node is going into notReady state as below

 $ kubectl get nodes
   NAME          STATUS   ROLES    AGE    VERSION
   controlPlane  Ready    master   192d   v1.12.10+1.0.15.el7
   worker1       Ready    <none>   192d   v1.12.10+1.0.14.el7
   worker2       NotReady <none>   192d   v1.12.10+1.0.14.el7

 # check if any of your cluster component is un-healthy or failed
 $ kubectl get pods -n kube-system
   NAME                                  READY   STATUS    RESTARTS   AGE
 calico-kube-controllers-bc8f7d57-p5vhk  1/1     Running   1          192d
 calico-node-9xtfr                       1/1     NodeLost  1          192d
calico-node-tpjz9 1/1 Running 1 192d calico-node-vh766 1/1 Running 1 192d coredns-bb49df795-9fn9g 1/1 Running 1 192d coredns-bb49df795-qq6cm 1/1 Running 1 192d etcd-bld09758002 1/1 Running 1 192d kube-apiserver-bld09758002 1/1 Running 1 192d kube-controller-manager-bld09758002 1/1 Running 1 192d kube-proxy-57n8h 1/1 NodeLost 1 192d kube-proxy-gvbkh 1/1 Running 1 192d kube-proxy-tzknm 1/1 Running 1 192d kube-scheduler-bld09758002 1/1 Running 1 192d

 # describe node to check what is causing issue
 $ kubectl describe node nodeName
 
 # ssh to node and ensure kubelet/docker services are running
 $ sudo systemctl status kubelet
 $ sudo systemctl status docker

 # troubleshoot services if not-running in depth
 $ sudo journalctl -u kubelet

 # if services are getting failed frequently try to reset daemon
 $ sudo systemctl daemon-reload


 Things to remember - In kube-system namespace for every cluster

 kube-apiserver  1pod/Master
 kube-controller 1pod/Master
kube-scheduler 1pod/Master
 etcd-node       1pod/Master

 core-dns - 2 pods/cluster and can be anywhere M/W

 calico/Network 1 pod/node every M/W (enable n/wing b/w pods)

 kube-proxy 1 pod/node every M/W (enable n/wing b/w nodes)

Some common failures


 # If fails with 
   [ERROR CRI]: container runtime is not running:
   rm /etc/containerd/config.toml
   systemctl restart containerd

 # If kubelet service fails at -
   Active: activating (auto-restart) (Result: exit-code) since Wed 2019-06-28 1
   first check "sudo journalctl -xeu kubelet" logs, if it says - 
            failed to load kubelet config file
   check the Drop-in file which kubelet is loading while activating the service

   $ sudo systemctl status kubelet

   if it is not loading - /etc/systemd/system/kubelet.service.d then correct it, 
   or remove anyother file that it is attempting to load & reload the daemon and restart service.

   $ systemctl daemon-reload
   $ systemctl restart kubelet

  also ensure kubelet, kubeadm, kubernetes-cni, kubernetes-cni-plugins & kubectl are of same minor version

 # If fails with 
   lower docker version update docker:
   docker.io (used for older versions 1.10.x)
   docker-engine (is used for before 1.13.x )
   docker-ce ( used for higher version since 17.03)
 $ apt-get install docker-engine 

 # If fails with 
   Unable to connect to the server: net/http: 
   request canceled while waiting for connection (Client.Timeout exceeded while awaiting headers)
 $ kubectl version // check kubectl client and server version - they shouldn't mismatch

 # if fails with
   [WARNING Service-Kubelet]: kubelet service is not enabled, 
   please run 'systemctl enable kubelet.service'
 $ systemctl enable kubelet.service

 # If fails with
   [ERROR Swap]: running with swap on is not supported. Please disable swap.
 $ swapoff -a
 $ sed -i '/ swap / s/^/#/' /etc/fstab

 # if fails with
   [ERROR NumCPU]: the number of available CPUs 1 is less than the required 2
   use command with flag --ignore-preflight-errors=NumCPU
   this will actually skip the issue. Please note, this is OK to use in Dev/test perhaps not in production. 

 # Run again 
 $ kubeadm init --apiserver-advertise-address=MasterIP \ 
   --pod-network-cidr=192.168.0.0/16 \ 
   --ignore-preflight-errors=NumCPU

 # if getting error
   The connection to the server localhost:8080 was refused - did you specify the right host or port?
   or on running 'kubectl version' it only gives client version but above error on server version
   if there is no context configured in your client you get such error
 $ kubectl config view
   apiVersion: v1
   clusters: []
   contexts: []
   current-context: ""
   kind: Config
   preferences: {}
   users: []

   you might have forgot to run below commands
   
 $ mkdir -p $HOME/.kube
 $ sudo cp -i /etc/kubernetes/admin.conf $HOME/.kube/config
 $ sudo chown $(id -u):$(id -g) $HOME/.kube/config

 # Make a note - to keep the k8s-cluster functional, following containers should be up & running all the time
 - kube-controller-manager > kube-scheduler > kube-etcd > kube-apiserver > kube-proxy + n/w containers (flannel/calico)  

 # Some magic commands -
   systemctl stop kubelet
   systemctl stop docker
   iptables --flush
   iptables -tnat --flush
   systemctl start kubelet
   systemctl start docker

   journalctl -xeu kubelet | less

 # Also, ensure following ports are open on masterNode -
   sudo firewall-cmd --permanent --add-port=6443/tcp
   sudo firewall-cmd --permanent --add-port=2379-2380/tcp
   sudo firewall-cmd --permanent --add-port=10250/tcp
   sudo firewall-cmd --permanent --add-port=10251/tcp
   sudo firewall-cmd --permanent --add-port=10252/tcp
   sudo firewall-cmd --permanent --add-port=10255/tcp
   sudo firewall-cmd –reload

   Ensure following ports are open on workerNode -
   sudo firewall-cmd --permanent --add-port=10251/tcp
   sudo firewall-cmd --permanent --add-port=10255/tcp
   firewall-cmd --reload

 # to check if the bridge traffic is flowing through the firewall? should return 1

   cat /proc/sys/net/bridge/bridge-nf-call-iptables
   cat /proc/sys/net/bridge/bridge-nf-call-ip6tables

 # if namespace stuck in terminating state 

   kubectl get ns mynamespace -o json > ns.json

   edit the ns.json file & empty the finalizer [""] and remove the kubernetes from it. even remove " "

   kubectl proxy

   open another terminal and run below command 

   curl -k -H "Content-Type: application/json" -X PUT --data-binary @ns.json http://127.0.0.1:8001/api/v1/namespaces/mynamespace/finalize

   boom namespace is gone by now


if you want to restore your cluster from a previously working state, take a backup of etcd directory which acts as a cluster database that holds all the kluster resource data present under /var/lib/etcd and may look like below 


fix the issue and restore the database and then restart its etcd-container.

Troubleshooting your application deployed on your kluster

Apart from doing kubectl logs you should investigate what is preventing your application to run, you're probably running into one of the following - 
  • The image can't be pulled
  • there's a missing secret of volume
  • no space in the cluster to schedule the workload
  • taints or affinity rules preventing the pod from being scheduled
in such case we have a magic command which one should get tattooed as there is not shortform to run this command that may help to investigate the issue


   kubectl get events --sort-by=.metadata.creationTimestamp -A
 
   kubectl top node


happy troubleshooting...

24 February 2018

Kubernetes: Orchestration framework for containers

Kubernetes is an open-source tool donated by Google after experiencing it for over 10 years as Borg. It is a platform to work with containers and is an orchestration framework for containers that give you: deployment, scaling, monitoring & health checks of containers. What Kubernetes cannot do is - it cannot provide CI/CD thus companies have to choose, which tool is a better fit in their architecture, since there are many opensource/CNCF tool available for it. 

K8s help in moving from host-centric infrastructure to container-centric infrastructure


Key things to remember 

In the virtualization world - the atomic unit of scheduling is VM, same way in docker its Container, and in Kubernetes it is Pod

Kubernetes comprises of control plane a.k.a master node & worker nodes.
we define our application requirement in k8s yaml's
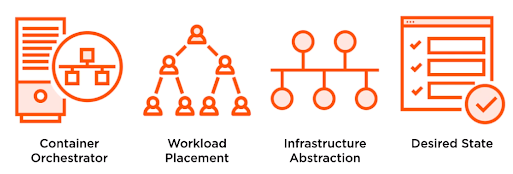
In k8s we enforce desired state management via a manifest.yaml file. That's where we feed the cluster service to run on the desired state in our infrastructure.
Pods running in the k8s cluster cannot be exposed directly it has to be via service.
All objects in Kubernetes are persistent.
Understand Kubernetes in 5 mins

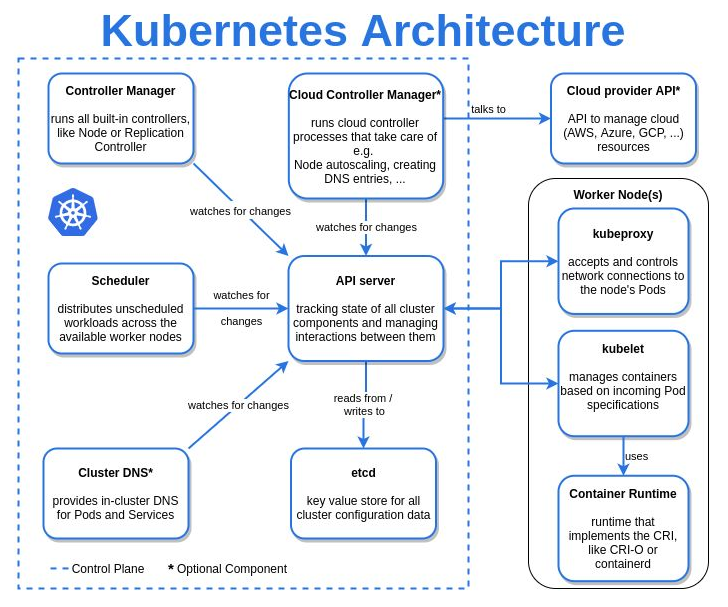
Kubernetes Architecture in detail


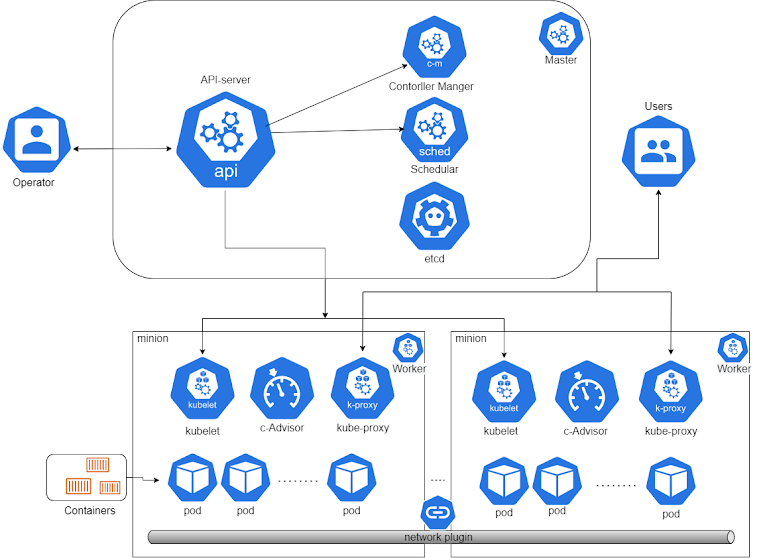
Kubernetes Architecture flow diagram


How does K8s API works? what will happen when you do $ kubectl apply -f manifest.yaml


Resources in Kubernetes

Control Plane/Master Node
master machine in the Kubernetes cluster
kube-api-server − This is an API that can be used to orchestrate the Docker containers.
etcd − k8s objects persist here. This component is a highly available key-value store used to hold and manage the critical information that distributed systems need to keep running. Most notably, it manages the configuration data, state data, and metadata for Kubernetes, here the various applications will be able to connect to the services via the discovery service.
kube-scheduler − This is used to schedule the newly created pods to nodes. Determines where workloads should run.
Controller-manager - monitors the state of a cluster & take action to ensure the actual state matches the desired state by communicating with the API server to initiate these actions. 
Cloud-controller-manager* - Runs controller that interacts with the underline cloud provider & links cluster to a cloud provider's API
CoreDNS - CoreDNS is a DNS server container that's often used to support the service discovery function in containerized environments. To install CoreDNS as the default DNS service while installing a fresh Kubernetes cluster use - 
$ kubeadm init --feature-gates CoreDNS=true

Data Plane/Worker Nodes
worker machines in the Kubernetes cluster
minion − is the node on which all the services run. You can have many minions running at one point in time. Each minion will host a service or application pod.
Kubelet − This is used to control the launching of containers via manifest files from the worker host. 
Container runtime - is responsible for downloading images and running them. other than docker podman and cri-o are the other two container runtimes k8s can use.
kube-proxy − is used to provide network proxy services that allow communication to the pod & to the outside world. 

basic objects in Kubernetes
which talks with the API server ensuring the pods and their associated containers are running.
Pod  Pods are Mortal & is the smallest unit of deployment in K8s object mode or is like hosting a service. Each POD can host a different set of Docker containers. The proxy is then used to control the exposure of these services to the outside world. You cannot create your own pods, they are created by replicasets.
Labels − use labels in your deployment manifest to target specific pods. that means pod with specific labels will only be manipulated depending on the label you have defined in your deployment manifest. 
Flannel − This is a back-end network that is required for the nodes. It manages an IPv4 network between multiple nodes in a cluster. It does not control how containers are networked to the host, only how the traffic is transported between hosts.
ReplicaSet  replicasets are created by deployments, these deployments contain a declaration of containers that you want to run in a cluster. It uses a template that dictates how to create the newly desired pod.
Deployment - it runs multiple replicas of your application preferably for stateless applications.
DaemonSet -  ensures that all Nodes run a copy of a Pod. As nodes are added to the cluster, Pods are added to them. As nodes are removed from the cluster, those Pods are garbage collected. Deleting a DaemonSet will clean up the Pods it created.

Advanced resources

context - it is a group of access parameters. Each context contains a Kubernetes cluster, a user, and a namespace. The current context is the cluster that is currently the default for kubectl: all kubectl commands run against that cluster. Kubernetes cheatsheet
ConfigMap - an API object that let you store your other object or application configuration, setting connection strings, analytics keys, and service URLs & further mounting them in volumes to use them as an environment variable & it is reusable across deployments.
sidecar - is just a container that runs in the same Pod as the application container, because it shares the same volume and network as the main container, it can “help” or enhance how the application operates. Common examples of sidecar containers are log shippers, log watchers, monitoring agents, aka utility containers. Ex - Istio

helm  helm is a package manager for k8s which allows to package, configure & deploy applications & services to k8s-cluster.
helm Chart  helm packages are called charts, consisting of few YAML configs and some templates that are cooked into k8s manifest file.
helm chart repository − these packaged charts brought available and can be downloaded from chart repos.

Mandatory Fields while writing a manifest file
In the manifest file for Kubernetes objects you want to create, you’ll need to set values for the following fields:
apiVersion - Which version of the Kubernetes API you’re using to create this object. for more on apiversions see this >  Different api versions to use in your manifest file
kind - What kind of object you want to create.
metadata - Data that helps uniquely identify the object, including a name string, UID, and optional namespace
spec - What state you desire for the object.

Service in Kubernetes
There are four ways to make a service accessible externally in the Kubernetes cluster
  • Nodeport: deployment that needs to be exposed as a service to the outside world can be configured with the NodePort type. In this method when deployment exposed, the cluster node opens a random port between default range: 30000-32767 on the node itself with IP (hence this name was given) and redirects traffic received on that random port to the underlying service endpoint which got generated when you expose your deployment. (combination of NodeIP + Port is NodePort ) accessing your app/svc as http://public-node-ip:nodePort
  • clusterIP is the default and most basic, which give service its own IP and is only reachable within the cluster.
  • Loadbalancer:  an extension of the NodePort type—This makes the service accessible through a dedicated load balancer, provisioned from the cloud infrastructure Kubernetes is running on. The load balancer redirects traffic to the node port across all the nodes. Clients connect to the service through the load balancer’s IP.
  • Ingress resource, a radically different mechanism for exposing multiple services through a single IP address. It operates at the HTTP level (network layer 7) and can thus offer more features than layer 4 services can.
Network in Kubernetes

Kubernetes default ethernet adapter is called cbr0 like you have docker0 for docker.

3 fundamental requirements in the k8s networking model:
  • All the containers can communicate with each other directly without NAT.
  • All the nodes can communicate with all containers (and vice versa) without NAT.
  • The IP that a container sees itself as is the same IP that others see it as.
Pods Networks
Implemented by CNI plugins like - calico, weave etc.
pod network is big and flat.
you have IP/Pod.
every pod can talk to any other pod via cni plugins.

Nodes Networks
All nodes need to be able to talk
kubelet <-> API Server
Every node on the n/w has this process running called Kubeproxy & kubelet 
n/w not implemeneted by k8s.

Service Networks
IP of your service is not tied up with any interface 
Kube-proxy in IPVS modes create a dummy interface on the service n/w, called kube-ipvs0 
whereas kube-proxy in IPTABLES mode does not.

Storage in Kubernetes
there are three types of access mode: 
RWO : Read Write Once    - only one pod in a cluster can access this volume
RWM : Read Write Many  - All pods in a cluster can access data from this volume
ROM : Read Only Many    - All pods in a cluster can only read data from this volume

Not all volume support all modes

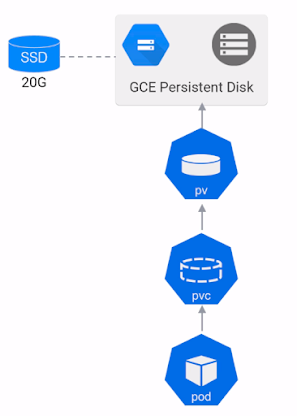
to claim the storage 3 properties has to match between PersistentVolume & PersistentVolumeClaim

1. accessMode
2. storageClassName
3. capacity 

have a look on to sample persistentVolume & persistentVolumeClaim to understand storage manifest
After you create the persistentVolume & persistentVolumeClaim, the Kubernetes control plane looks for a PersistentVolume that satisfies the claim's requirements. If the control plane finds a suitable PersistentVolume with the same StorageClass, it binds the claim to the volume.
as of now the pv is not claimed by any pvc and thus is available and waiting for a pvc to claim it.
after you deploy the persistentVolume(pv) & persistentVolumeClaim (pvc) you can assign it to your running pod using below kind 

---
apiVersionv1
kindPersistentVolume
metadata
  namepv
spec:
  accessModes
- ReadWriteOnce
storageClassNamessd
capacity
   storage10Gi
hostPath:
   path: "/mnt/mydata"
...
---
apiVersionv1
kindPersistentVolumeClaim
metadata
  namepvc
spec:
  accessModes
- ReadWriteOnce
storageClassNamessd
capacity
   storage10Gi
...

Deployment in Kubernetes

Deployment is all about scaling and updating your release. You deploy your container inside a pod and scale them using replicaSet. It is not only updating replicaSet will do the rolling update, we can add a strategy also in the deployment manifest to get the job done.
strategy:
 typeRollingUpdate
 rollingUpdate:
   maxUnavailable25%
   maxSurge1

an ideal deployment manifest will look like deployment.yml
its deployment manifest you need to update whenever you want to scale your application tune your number of replicaSet if you want to update the app modify your image version or anything just tweak the deployment manifest and it will redeploy your pod communicating with api-server 


Autoscaling in Kubernetes

when demand goes up, spin up more Pods but not via replicaset this time. Horizontal pod autoScaler is the answer. The Kubernetes autoscaling feature is to scale up and down based on demand. This feature can be added to your deployment from the CLI by using the autoscale command or adding it into the deployment manifest. 

IF
---
apiVersionv1
kindDeployment
metadata
  namemydeploy
  namespace: myapp-ns
spec:
  replicas3
...

THEN
---
apiVersion: autoscaling/v2
kind: HorizontalPodAutoscaler
metadata:
  name: my-hpa
  namespace: myapp-ns
spec:
  scaleTargetRef:
    apiVersion: apps/v1
    kind: Deployment
    name: mydeploy
  minReplicas: 1
  maxReplicas: 3
  metrics:
  - type: Resource
    resource:
      name: cpu
      target: 
        averageUtilization: 50
        type: Utilization
...

Rolling Update in Kubernetes

ReplicaSet and autoscaling are important to minimize downtime and service interruptions. whereas rolling updates provide a way to roll out app changes in an automated and controlled fashion throughout the pods. It works with pod templates such as deployments and it allows for rollback if something goes wrong.

How do you enable Rolling updates in your application
- Add livenessProbe & readinessProbe to your deployment, which ensures deployments are marked ready appropriately.
- Add rolling update strategy to your yaml file 

---
apiVersionv1
kindDeployment
metadata
  namemydeploy
spec:
  strategy
   typeRollingUpdate
    maxUnavailable50%
maxSurge2
...

# apply the updated image
$ kubectl set image deploy/my-deploy my-deploy=registry/my-deploy:2.0
deployment.extensions/my-deploy image updated

# validate the rollout
$ kubectl rollout status deploy/my-deploy
deployment "my-deploy" successfully rolled out

# undo the rollout
$ kubectl rollout undo deploy/my-deploy
deployment.extensions/my-deploy rolled back